Hamilton T1 transport ventilator set-up guide & pre-use checks

Warning

Objectives

  • The Hamilton T1 ventilator is to be used for internal hospital transfers of PICU ventilated patients (e.g. to/from medical imaging.)
  • Where possible, mechanical ventilation is preferrable to hand ventilation for reasons not limited to: physiological and acid-base stability, lung protection, transfer team ergonomics and infection control.
  • RHC ED Resus also has a fleet of these ventilators which may be used by PICU staff during the course of their duties in ED or loaned temporarily should the PICU machine be unavailable.
  • The same ventilator is used for all Paediatric ScotSTAR transfers although some differences in software may exist.

Summary of important device information

  • The Hamilton T1 can ventilate ALL patient sizes (neonate-adult) and can give a continuously adjustable FiO2 from 21 – 100% (unlike some other transport ventilators which allow only fixed options (e.g. air/60%/100%)
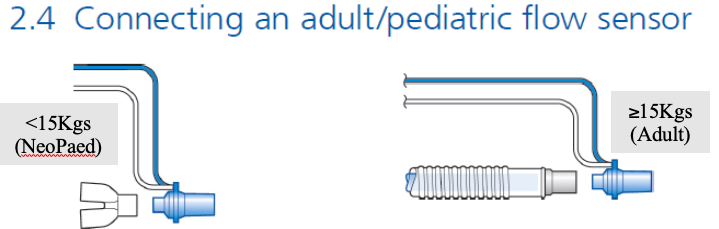
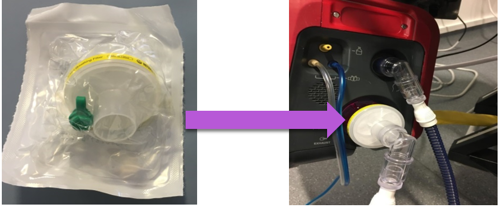
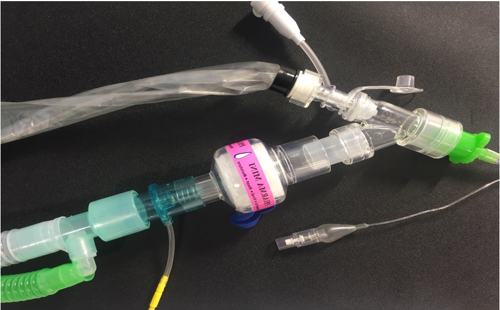
  • It has TWO different breathing circuit types depending on patient size
  • It has TWO different expiratory valve types depending on patient size
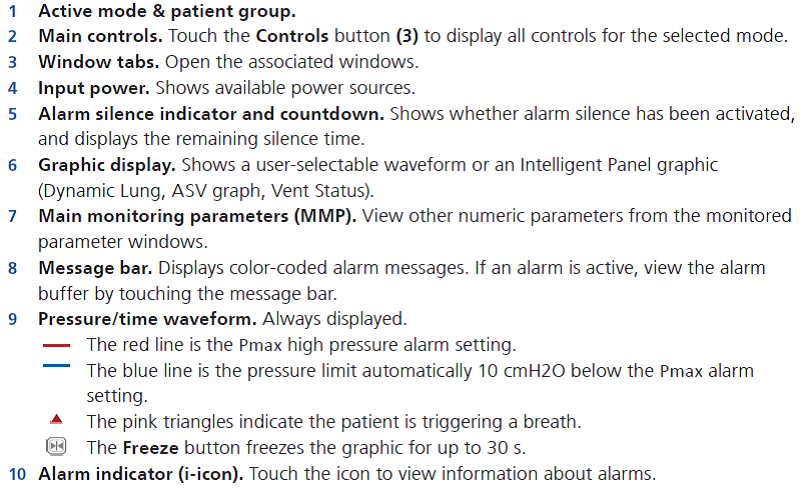
  • It has TWO different flow sensor types depending on patient size
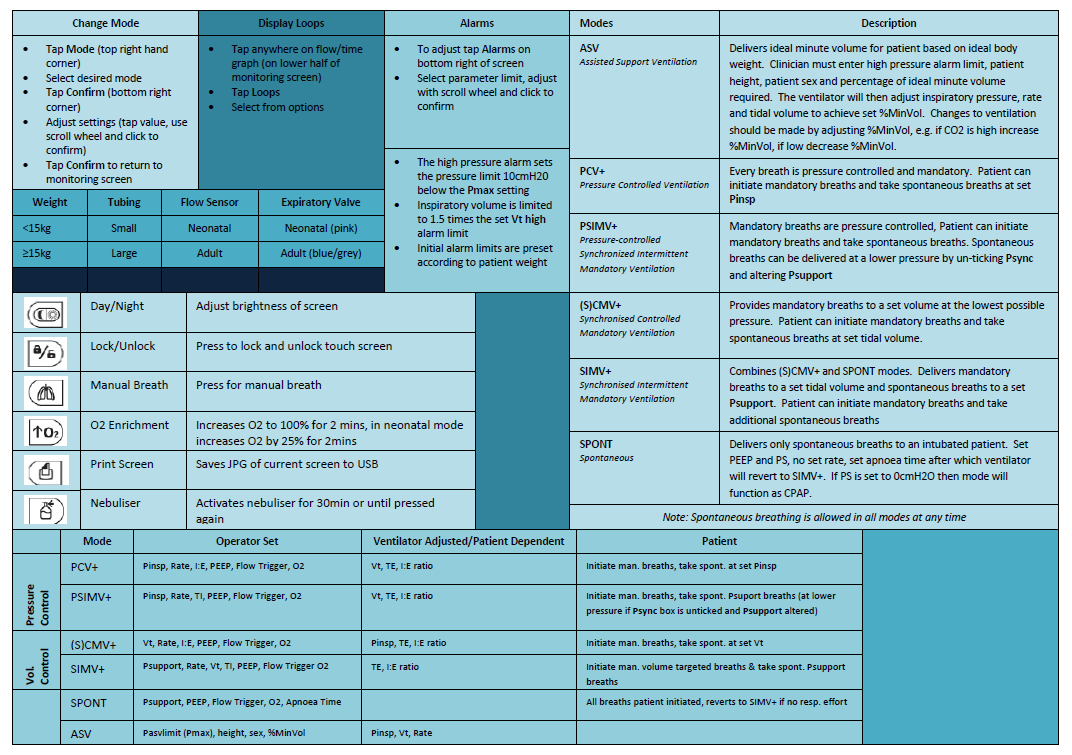
    • TABLE 1 summarises the different potential configurations of these
  • It does NOT deliver heated-humidified gas without the addition of a passive or active humidfication device. Ventilation without humidification presents a risk of airway obstruction from retained secretions and also increases insensible water loss. It is to be AVOIDED.
  • It can deliver Non-Invasive Ventilation (NIV), HiFlo as well as invasive ventilation modes. We will not be using it for mobile HiFlo.
  • It has TWO internal batteries and a mains plug. It should remain PLUGGED IN when not in use or when static,
    • Power consumption is VARIABLE depending on settings
  • A transfer should not be commenced if the battery icon is reading below 70%
  • It uses 4-bar Medical Oxygen via a Schrader valve. Oxugen cylinder heads used in RHC may have either a TWIST RELEASE or PUSH RING RELEASE Schrader valve to disconnect the ventilator from the cylinder head.
    • Oxygen consumption is VARIABLE depending on settings
    • see TABLE 2 for more details
    • for
  • It is not MRI compatible.
  • Patient monitoring during transfer will be delivered by standard PICU Philips X3 transport monitors or equivalent (i.e. in RHC we do NOT use the Hamilton T1’s internal ability to monitor SpO2 & etCO2..

WHERE TO FIND IT

  • The Hamilton T1 is stored on the bench on the right side of the PICU Clean Utility Room at Staff Base 2.
    If the machine is still in use on another patient, a loan T1 can be obtained from the four machines in ED Resus at the discretion of the ED Charge Nurse.
    (Remember to CLEAN IT and RETURN to ED after use.)
  • It should ALWAYS be plugged into mains power when not in use

1. Hamilton ventilator basic views

Ventilator front view

Ventilator side view, with gas connections

  1. USB connector
  2. High-pressure oxygen DISS or NIST inlet fitting
  3. Low-pressure oxygen connector
  4. AC power receptacle
  5. Cooling air intake and dust filter. Do not obstruct.
  6. AC power cord with retaining clip
  7. Serial number label
  8. DC power receptacle


Main display

2. Setting up the ventilator

2. Setting up the ventilator, 2.1 Installing the expiratory valve


2.2 Connecting a coaxial breathing circuit

2.3 Connecting a dual limb circuit

2.5   Circuit set-up

There are 2 potential set-ups for the transport ventilator and each requires a slightly different arrangement for checking of the flow sensor & adaptor - these are weight banded:

<15kg: For this document we will term this group NeoPaeds,

  • This set-up includes:

Pink expiratory flow valve (comes separately from other items below)

Blue/White vent tubing

Blue/White flow probe

Dumbbell shaped adaptor

The T1 senses which valve is in place.

With the Pink valve you can select either Neonatal or Paediatric mode on the ventilator screen. Go with the appropriate weight for the patient.

NB with the pink valve in place you will NOT be able to select Adult mode.

15Kg: This group uses standard set up for adults

  • This set-up all comes in the same bag & includes:   

Blue/grey expiratory flow valve

White dual lumen vent tubing

Blue/White flow probe

Funnel shaped adaptor

The T1 senses which valve is in place.

With the Blue/grey valve you can select either Adult or Paediatric mode on the ventilator screen. Go with the appropriate weight for the patient.

NB with the blue valve in place you will NOT be able to select the Neonatal mode.


This table summarises the different set ups:

Patient Group

Valve (type/colour)

Flowsensor

Circuit

Adaptor for pre-use check

Ventilator Mode

NeoPaeds (<15kg)

Neonatal (pink)

Neonatal/paeds

Paediatric

Dumbbell

Select either Neonatal or Paediatric according to patient

Adult

(>15kg)

Adult (Blue or grey - white/plastic)

Adult

Adult

Funnel

Select either Paediatric or Adult according to patient

2.6 Passive Humidification, ETCO2 connections, inline suction, expiratory valve filters, and Adaptations for Patients with suspected Highly Infectious Respiratory Disease

  • A Y-piece Heat-Moisture Exchanger Filter (HMEF) should be ALWAYS be used to provide passive inspired gas HUMIDIFICATION and to protect the ventilator from BACTERIAL CONTAMINATION by aerosolised respiratory secretions.
  • An additional High Efficiency “yellow” filter MUST ALSO be used at the EXPIRATORY VALVE in any patient suspected to have a highly infectious respiratory disease. This is to prevent VIRAL AEROSOLISATION from the ventilator exhaust.
  • In-line suction should be used where possible (ETT ≥ 4.0) for any patient suspected to have a highly infectious respiratory disease – for example where enhanced PPE is required
  • Please also read section 9.1 if further information is required for highly infectious disease transfers
  • All necessary consumable equipment is stored in the cupboard under the Hamilton-T1 in the PICU Clean Utility Room at Staff Base 2
  • The HMEF and Expiratory Valve filter connections are shown in the illustrations below:

Dual limb circuit (<15kg)                                         

  • Attach filter to expiratory port (Intersurgical Clear Guard Midi - ref 1644000)


  • <4.0 ETT Patient-end of circuit should be set-up as detailed below


  • ETT ≥4.0 should be set up as follows, with appropriate sized ventilator tubing & flow sensor & in-line suction as per the patient’s weight:

Co-axial (Paed/Adult) ventilator tubing (≥15kg)

  • A - Attach connector to inspiratory port (Intersurgical Connector 22M-22F- ref 1961000S)
  • B - Attach filter to expiratory port (Intersurgical Clear Guard Midi - ref 1644000)


  • In-line suction should be used where possible (ETT ≥ 4.0)
  • etCO2 should be placed “above” the pink Pharma HME-F filter (this allows VT up to 900ml) as detailed below

Ayres T-piece set-up

  • As routine please also ensure the T-piece has the High Efficiency bacterial/viral filters (Intersurgical HME-F 14410000) attached as shown and gas supply to the T-Piece should be switched off when not in use.
  • These filters should be changed every 24 hours and between patients if a new T-piece is not used.


  • T-Piece < 4.0 ETT


  • T-Piece 4.0 ETT and above
    Use small etCO2 if ETT is 4.5 or less and large etCO2 if ETT 5.0 or above

3. Tests and calibrations

3. Tests and calibrations, 3.1 Performing the preoperational checks, Step One parts 1 and 2

Step one Part 4, Step two Part 1

NB     Remember to remove the “pre-use check” adaptor prior to use on a patient

O2 test check if needed – we don’t do this routinely

Loss of external power test


3.2 If the preoperational check fails flowchart

4. Ventilating a patient

  • Once all the checks have been completed, you will be in the standby screen from where you can set your initial settings.
  • IF YOU ARE UNDERTAKING AN INTERNAL TRANSFER, CHECK THE BATTERY ICONS STATUS BEFORE COMMENCING VENTILATION. IF BELOW 70%, DO NOT USE, OBTAIN A LOAN MACHINE FROM ED RESUS.
  • Select the appropriate patient group (neonatal or adult/paed) by touching the appropriate patient group button.
  • You can set your initial ventilator settings using either quick setup (see fig 4.1 below) or set them manually.
  • For the Neonatal patient group, you can enter the weight directly but for the adult/paed patient group use the Gender and height to arrive at the IBW
  • Input your patient's height/length by using the pat.height button and the ventilator calculates and displays the Ideal body weight (IBW). If you do not have a height, use the height button to arrive at an IBW that is closer to your patient’s weight.
  • Each of the quick setup buttons have preconfigured ventilatory mode, ventilatory settings and alarm limits.
  • You can change the mode, settings and alarm limits if needed as detailed in figures 4.2, 4.3 and 4.4.
  • You can also set all your initial ventilatory mode, settings and alarm limits manually without using the quick setup buttons as per the following figures.

4. Ventilating a patient, 4.1 Using Quick Setup

Steps to start ventilation


4.2 Selecting modes diagram

NB

The Pinsp is actually a ΔP (ie Pressure above PEEP)

Set Ti for ventilation last (as will reset if you adjust weight/height settings)

High pressure alarm

Auto-set alarms can be made only adult mode

5. Monitoring patient data

5. Monitoring patient data

6. Ensuring an adequate oxygen supply for patient transport

6. Ensuring an adequate oxygen supply for patient transport

Table 2

Table 3: Summary of features

6.2 Quick reference guide

7. Attaching iNO to Hamilton T1

NoxBox can be attached to the Hamilton T1 using the neo/paeds tubing only:

7.1 Access NoxBox pack 7.2 Open contents 7.3 Select components
7.4 Attach funnel to iNO. Attach sampling line to delivery device 7.5 Attach to inspiratory port (blue) of Hamilton T1 7.6 Remove adaptor from nCPAP pressure pack delivery device
7.4 Attach funnel to iNO. Attach sampling line to delivery device 7.5 Attach to inspiratory port (blue) of Hamilton T1 7.6 Remove adaptor from nCPAP pressure pack (in vent tubing pack)
7.7 Attach adaptor between inspiratory limb (blue) and swivel vent connector 7.8 Attach NoxBox sampling line to adaptor  

8. Glossary of control parameters

Parameter
Definition
Apnea Backup A function that provides ventilation after the adjustable apnea time passes without breath attempts. If "Automatic" is enabled, control parameters are calculated based on the patient's IBW.
ETS Expiratory trigger sensitivity. The percentage of peak inspiratory flow at which the ventilator cycles from inspiration to exhalation.
Flow trigger The patient's inspiratory flow that triggers the ventilator to deliver a breath.
Gender Sex of patient. Used to compute ideal body weight (IBW) for adults and pediatrics.
I:E Ratio of inspiratory time to expiratory time. Applies to mandatory breaths.
%MinVol Percentage of minute volume to be delivered in ASV mode. The ventilator uses the %MinVol, Pat. height, and Gender settings to calculate the target minute ventilation.
Oxygen Oxygen concentration to be delivered. 
Pasvlimit The maximum pressure to apply in ASV mode. Changing Pasvlimit or the Pressure alarm limit automatically changes the other: The Pressure alarm limit is always 10 cmH2O greater than Pasvlimit.
Pat. height Patient height. It determines the ideal body weight (IBW), which is used in calculations for ASV and startup settings for adults and pediatric patients.
Pcontrol The pressure aditional to PEEP/CPAP.
PEEP/CPAP Positive end expiratory pressure.
P high The high pressure setting in APRV and DuoPAP modes. Absolute pressure, including PEEP.
Pinsp Pressure (additional to PEEP/CPAP) to apply during the inspiratory phase. Applies in PSIMV+ IntelliSync and NIV-ST.
P low The low pressure setting in APRV.
P-ramp Pressure ramp. Time required for inspiratory pressure to rise to the set (target) pressure.
Psupport Pressure support for spontaneous breaths in SPONT, NIV, and SIMV+ modes.
Rate Respiratory frequency or number of breaths per minute.
Sigh Breaths delivered at a regular interval (every 50 breaths) at a pressure up to 10 cmH2O higher than non-sigh breaths, as allowed by the Pressure alarm limit.
Thigh Length of time at the higher pressure level, P high, in DuoPAP and APRV modes.
TI Inspiratory time, the time to deliver the required gas (time to reach the operator-set Vt or Pcontrol value).
TI max Maximum inspiratory time for flow-cycled breaths in NIV, NIV-ST, and SPONT in neonatal modes.
TI low Length of time at the lower pressure level, P low, in APRV mode.
Vt Tidal volume delivered during inspiration in (S)CMV+ and SIMV+ modes.
Vt/kg Tidal volume per weight.


9. Safe use of Hamilton medical ventilators on patients with highly infectious diseases

Safe use of Hamilton Medical ventilators on patients with highly infectious diseases

Editorial Information

Last reviewed: 16/03/2026

Next review date: 31/03/2029

Author(s): M Davidson, T Geary, K Martin.

Version: 1.81

Approved By: PICU Guidelines Group

References

All images sources from product documentation remain copyright Hamilton Medical.